R-CNN/ Fast R-CNN/ Faster R-CNN/ Mask R-CNN : A comparison report

Region-Convlutional Neural Networks (R-CNN) are another State-of-art Detection and Localization Algorithms developed by Ross Grishick, Jeff Donahue, Trevor Darrell, Jitendra Malik.

A significant progress in the domain of object recognition and localization was seen mainly because of Low-Level feature extractors life SIFT and HOG ( a semi-local orientation histograms), while R-CNNs came with the idea of Multi-level, multi-stage Feature Extraction.  R-CNN were supposed to improve mAP by 50% relative to the result on VOC-2012, therefore achieving mAP of 62.4%. It brought with itself 2 ideas :

1. For better localization and object segmentation, applying CNNs to a bottom-up Region Proposals.
2. Supervised pre-training for Auxillary tasks followed by domain specific fine tuning.

Unlike a Classification problem, Object Detection requires localization of objects within an image, for which we have multiple approaches :

1. Framing Detection as a Regression problem and Use of anchor Boxes (YOLO)
2. A sliding window technique
3. Recognition using Regions, (R-CNN method)
  • This R-CNN system generates 2000 category independent Region Proposals at Test time for an Input Image (the base paper uses Selective Search method for region proposal).
    Other Methods of region proposal are :
    >>  Objectness[1]; category-independent object proposals[2]; constraint parametric mini-cuts (CPMC)[3]; multi-scale combinatorial grouping[4];  mitotic cells obtained by applying CNN to regularly spaced square crops[5]
  • Feature Vector Extraction from each region proposal using CNN
  • Classification of each region with category specific Linear SVM

Base paper also talks about the challenge of scarce labelled data, is using  Supervised pre-training on a Large auxiliary dataset followed by domain specific fine tuning on small (Pascal) is effective for Learning high-capacity CNNs

rcnn

Feature Extraction in R-CNN

In the base implementation, features of fixed length are extracted from Each region proposals using a CNN architecture.
Here most experiments used Caffe implementation of CNN which is described by TorontoNet (Krizhevksy et-al)[6]. Experimentation with OxfordNet (Simonyan & Zisserman)[7] was also made.

Feature Vectors are 4096 dimensional .
We first convert Image Data in a region proposal into a fixed input size of S x S pixel size.
For TorontoNet S = 227, while for OxfordNet S = 224.

Training 

CNN was pre-trained on Auxilary Dataset (ILSVRC2012) using image-level annotations (bounding box is not available for this data). Pre-training was  performed using open source caffe CNN library.

Selective Search Algorithm :
          > By initial sub-segmentation of images, generate 2000 Region Proposals
          > Using greedy Algorithm, combine similar regions to larger ones
          > Using this final generated region as candidate region proposal
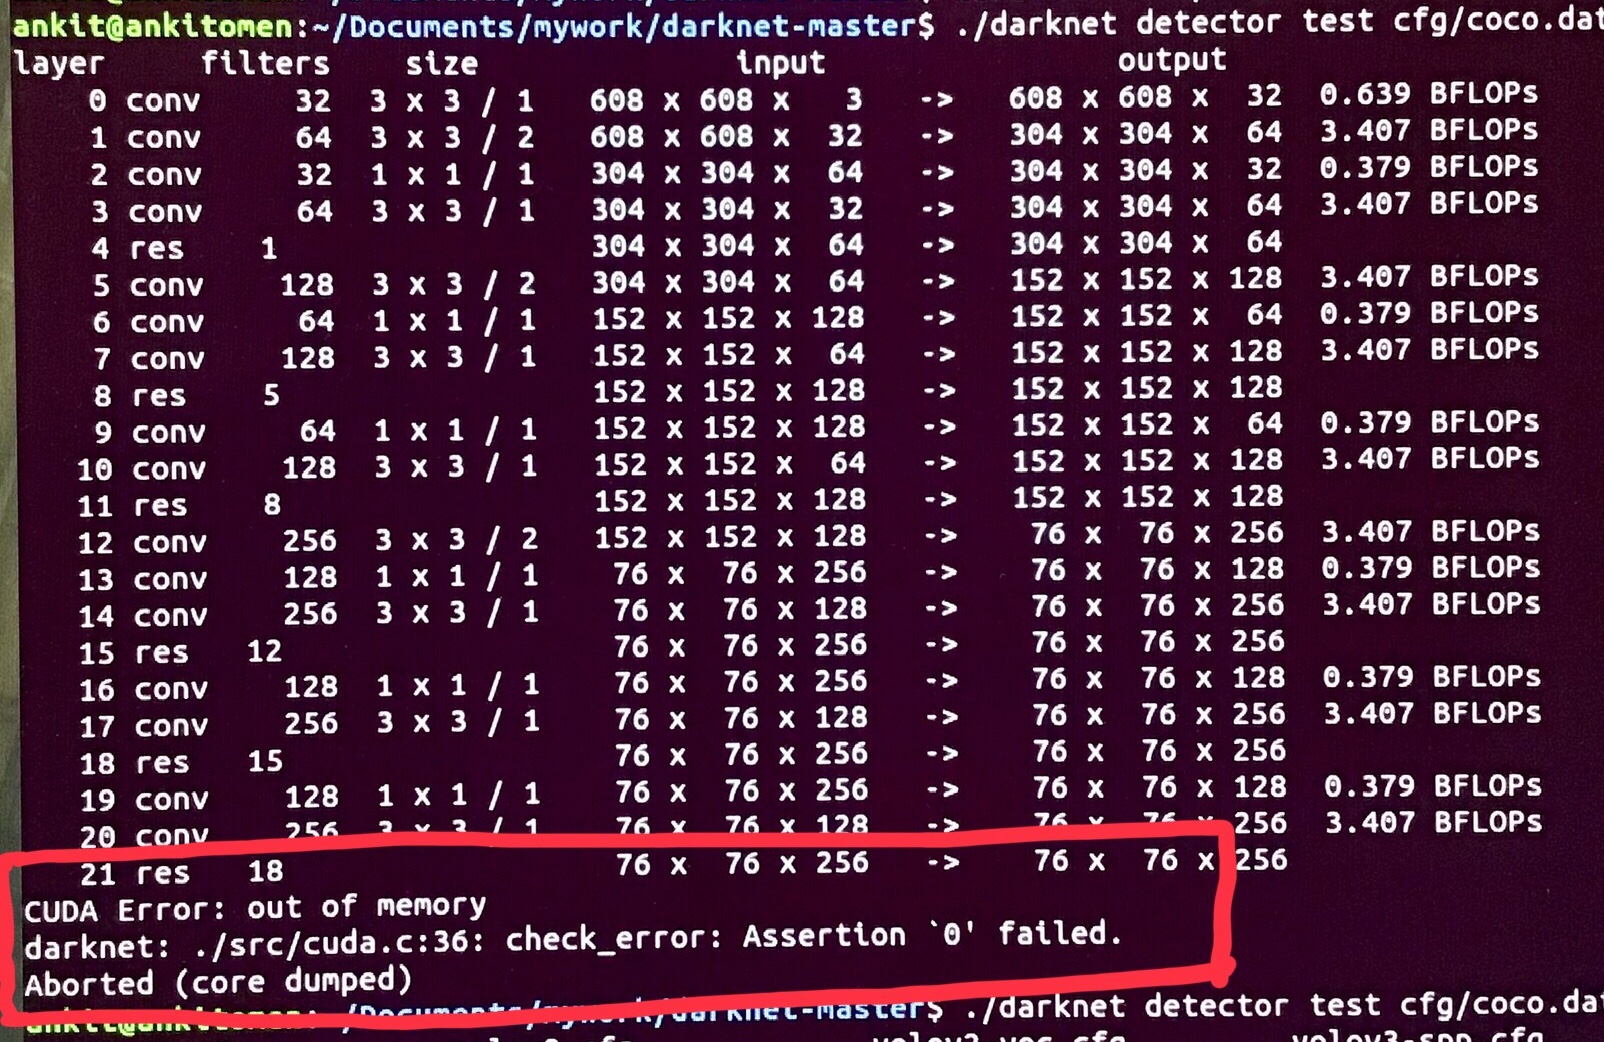
Problems with R-CNN

  • Training of the model requires a considerate amount of time as we have to classify 2000 region proposal per image.
  • Not suited for Real -Time application due to above reason

Scaling and Improvement to R-CNN

  1. He et-al improves R-CNN efficiency by sharing, computation through a feature pyramid allowing for detection at few frames per sec. (SSPnet)
  2. Dominant approach to object detection was sliding-window detectors. The selective-search algorithm of Van-de-Sande popularized the multiple segmentation approch by showing strong result on PASCAL object detetction. This is an Active Search Area now :
    a) Edge boxes: outputs high quality rectangular box proposal quickly (0.3s/img)
    b) BING: generates box proposal at 3ms/img.


FAST R-CNN

Fast R-CNN builds up on the work of R-CNN.
The major improvements that  were made to the R-CNN model for detection significantly improved both  Time and Performance so much so that Fast R-CNN is 9 times faster than R-CNN at training and 213 times faster at Testing.

Architectural modifications

  • Instead of individual Region proposals being fed to CNN, complete image is fed as an Input for feature extraction.
  • From this feature map region proposals are extracted using Selective Search Algorithm and using ROI pooling they are reshaped into fixed size.
  • this reshaped regions are fed to the (fully connected) FC layer.
  • A softmax layer is used to predict the class of proposed region and values of bounding box instead of SVM in R-CNN

Therefore major reason for the fastness of this Architecture can be correlated to the fact that we do not have 2000 region proposals to be fed to a CNN every time.


FASTER R-CNN


REFERENCES

[1] : B. Alexe, T. Deselaers, and V. Ferrari, “Measuring the objectness of image windows,” TPAMI, 2012.
[2] : I. Endres and D. Hoiem, “Category independent object proposals,” in ECCV, 2010. 
[3] : J. Carreira and C. Sminchisescu, “CPMC: Automatic object segmentation using constrained parametric min-cuts,” TPAMI, 2012.
[4] : P. Arbel´aez, J. Pont-Tuset, J. Barron, F. Marques, and J. Malik, “Multiscale combinatorial grouping,” in CVPR, 2014.
[5] : D. Cires¸an, A. Giusti, L. Gambardella, and J. Schmidhuber, “Mitosis detection in breast cancer histology images with deep neural networks,” in MICCAI, 2013.
[6] : A. Krizhevsky, I. Sutskever, and G. Hinton, “ImageNet classification with deep convolutional neural networks,” in NIPS, 2012.
[7] : K. Simonyan and A. Zisserman, “Very deep convolutional networks for large-scale image recognition,” in ICLR, 2015.


VS2017 integration with OpenCV+OpenCV_contrib_2

  1. download VS2017
    o0AaA
  2. download cmake, Opencv from git and opencv_contrib from git
    Capture
  3. https://putuyuwono.wordpress.com/2015/04/23/building-and-installing-opencv-3-0-on-windows-7-64-bit/
  4. https://www.deciphertechnic.com/install-opencv-with-visual-studio/
  5. https://pterneas.com/2018/11/02/opencv-cuda/Configuring opencv and opencv-contrib for nsight eclipse
  6. https://www.talentica.com/blogs/opencv-with-extra-modules/
  1. http://sayef.tech/posts/2018/07/15/eclipse-opencv-and-ubuntu

stable installation versions for tensorflow+keras

keras==2.2.4

#tensorflow==1.12

numpy==1.16.4

tensorflow-gpu == 1.9

Compiling opencv with CUDA: please take the following into consideration.
1. With BUILD_PERF_TESTS and BUILD_TESTS disabled

VS2017 integration with OpenCV + OpenCV_contrib

This is a consolidated step to install Visual Studio 2017 with Opencv + Opencv Extra Modules.

  1. download Visual Studio 2017 version 15.9.
  2. install with minimum but important features as below, also do include Windows 10 SDK.o0AaA
  3. Download the Opencv + Opencv_Contrib from git. I used the version Opencv3.4.5
    from here

  4. Download CMAKE, I used version 3.16
    Capture
  5. Now follow steps from here:
    https://putuyuwono.wordpress.com/2015/04/23/building-and-installing-opencv-3-0-on-windows-7-64-bit/
  6. Clone Gstreamer to integrate withgstremerD:/opencv/gstremer/1.0/x86_64/include/glib-2.0
    D:/opencv/gstremer/1.0/x86_64/lib/glib-2.0/include
    D:/opencv/gstremer/1.0/x86_64/include/gstreamer-1.0/gst/
    D:/opencv/gstremer/1.0/x86_64/lib/gstapp-1.0.lib
    D:/opencv/gstremer/1.0/x86_64/lib/gstreamer-1.0/include
  7. Install FFmpeg and add to path,  — cmake should automatically detect ffmpeg.

NOTE: Build for x64 and Release was compiled properly

Follow for Gstreamer on Windows from here :https://medium.com/@galaktyk01/how-to-build-opencv-with-gstreamer-b11668fa09c

FFMPEG and GSTREMER with CMAKE UBUNTU

  1. Install Fmmpeg from the link follow complete instruction in ubuntu https://trac.ffmpeg.org/wiki/CompilationGuide/Ubuntu
  2. https://towardsdatascience.com/how-to-install-opencv-and-extra-modules-from-source-using-cmake-and-then-set-it-up-in-your-pycharm-7e6ae25dbac5
  3. https://docs.opencv.org/2.4/doc/tutorials/introduction/linux_eclipse/linux_eclipse.html


Optimization : Boltzmann Machines & Deep Belief Nets

As we have already talked about the evolution of Neural nets in our previous posts, we know that since their inception in 1970’s, these Networks have revolutionized the domain of Pattern Recognition.

The Networks developed in 1970’s were able to simulate a very limited number of neurons at any given time, and were therefore not able to recognize patterns involving higher complexity.
However, by the end of  mid 1980’s these networks could simulate many layers of neurons, with some serious limitations – that involved human involvement (like labeling of data before giving it as input to the network & computation power limitations ). This was possible because of Deep Models developed by Geoffery Hinton. 
Hinton in 2006, revolutionized the world of deep learning with his famous paper ” A fast learning algorithm for deep belief nets ”  which provided a practical and efficient way to train Supervised deep neural networks.

In 1985 Hinton along with Terry Sejnowski invented an Unsupervised Deep Learning model, named Boltzmann Machine. These are Stochastic (Non-Deterministic) learning processes having recurrent structure and are the basis of the early optimization techniques used in ANN; also known as Generative Deep Learning model which only has Visible (Input) and Hidden nodes.

OBJECTIVE

Boltzmann machines are designed to optimize the solution of any given problem, they optimize the weights and quantity related to that particular problem.

It is of importance to note that Boltzmann machines have no Output node and it is different from previously known Networks (Artificial/ Convolution/Recurrent), in a way that its Input nodes are interconnected to each other.

The below diagram shows the Architecture of a Boltzmann Network:

All these nodes exchange information among themselves and self-generate subsequent data, hence these networks are also termed as Generative deep model.

These Networks have 3 visible nodes (what we measure) & 3 hidden nodes (those we don’t measure); boltzmann machines are termed as Unsupervised Learning models because their nodes learn all parameters, their patterns and correlation between the data, from the Input provided and forms an Efficient system. This model then gets ready to monitor and study abnormal behavior depending on what it has learnt.
This model is also often considered as a counterpart of Hopfield Network, which are composed of binary threshold units with recurrent connections between them.

Types of Boltzmann Machines

  • EBM ( Energy Based models )
  • RBM (Restricted Boltzmann Machines )


Energy – Based Models

EBMs can be thought as an alternative to Probabilistic Estimation for problems such as prediction, classification, or other decision making tasks, as their is no requirement for normalisation.

Formula for Boltzmann Distribution

This equation is used for sampling distribution memory for Boltzmann machines, here,  P stands for Probabilityfor Energy (in respective states, like Open or Closed), T stands for Timek: boltzmann constantTherefore for any system at temperature T, the probability of a state with energy, E is given by the above distribution.
Note: Higher the energy of the state, lower the probability for it to exist.

In the statistical realm and Artificial Neural Nets, Energy is defined through the weights of the synapses, and once the system is trained with set weights(W), then system keeps on searching for lowest energy state for itself by self-adjusting.
These EBMs are sub divided into 3 categories:

  • Linear Graph Based Models ( CRF / CVMM / MMMN )
  • Non-Linear Graph Based models
  • Hierarchical Graph based models

Conditional Random Fields (CRF) use a negative log-likelihood loss function to train linear structured models.
Max-Margin Markov Networks(MMMN) uses Margin loss to train linearly parametrized factor graph with energy func- optimised using SGD.

Training/ Learning in EBMs 

The fundamental question that we need to answer here is ” how many energies of incorrect answers must be pulled up before energy surface takes the right shape.
Probabilistic learning is a special case of  energy based learning where loss function is negative-log-likelihood. The negative log-likelihood loss pulls up on all incorrect answers at each iteration, including those that are unlikely to produce a lower energy than the correct answer. Therefore optimizing the loss function with SGD is more efficient than black-box convex optimization methods; also because it can be applied to any loss function- local minima is rarely a problem in practice because of high dimensionality of the space.

Restricted Boltzmann Machines & Deep Belief Nets

Shifting our focus back to the original topic of discussion ie
Deep Belief Nets, we start by discussing about the fundamental blocks of a deep Belief Net ie RBMs ( Restricted Boltzmann Machines ).

As Full Boltzmann machines are difficult to implement we keep our focus on the Restricted Boltzmann machines that have just one minor but quite a significant difference – Visible nodes are not interconnected – .
RBM 
algorithm is useful for dimensionality reduction, classification, Regression, Collaborative filtering, feature learning & topic modelling.

The important question to ask here is how these machines reconstruct data by themselves in an unsupervised fashion making several forward and backward passes between visible layer and hidden layer 1, without involving any further deeper network.

note : the output shown in the above figure is an approximation of the original Input.
Since the weights are randomly initialized, the difference between Reconstruction and Original input is Large.

It can be observed that, on its forward pass, an RBM uses inputs to make predictions about node activation, or the probability of output given a weighted x: p(a|x; w). But on its backward pass, when activations are fed in and reconstructions of the original data, are spit out, an RBM is attempting to estimate the probability of inputs x given activations a, which are weighted with the same coefficients as those used on the forward pass. This second phase can be expressed as p(x|a; w). Together giving the joint probability distribution of x and activation a .

Reconstruction is making guesses about the probability distribution of the original input; i.e. the values of many varied points at once. This is known as generative learning, and this must be distinguished from discriminative learning performed by classification, ie mapping inputs to labels.

Conclusions & Next Steps

You can interpret RBMs’ output numbers as percentages. Every time the number in the reconstruction is not zero, that’s a good indication the RBM learned the input.

It should be noted that RBMs do not produce the most stable, consistent results of all shallow, feedforward networks. In many situations, a dense-layer autoencoder works better. Indeed, the industry is moving toward tools such as variational autoencoders and GANs.

Bias vs Variance Tradeoff

Bias is, assumptions made by a model to make the target function easier to learn; therefore :

  • LOW BIAS : refers to less assumptions made about the form of the target function.
  • HIGH BIAS : refers to high assumptions made about the form of the target function.

Low-bias machine learning algorithms include: Decision Trees, k-Nearest Neighbors and SVMs (Support Vector Machines).
High-bias machine learning algorithms include: Linear Regression, Linear Discriminant Analysis and Logistic Regression.

Ont the other hand, Variance is the estimate value of change of Target function if different training data was used, therefore:

  • Low Variance: Suggests small changes to the estimate of the target function with changes to the training dataset.
  • High Variance: Suggests large changes to the estimate of the target function with changes to the training dataset.

Low-variance machine learning algorithms include: Linear Regression, Linear Discriminant Analysis and Logistic Regression.
High-variance machine learning algorithms include: Decision Trees, k-Nearest Neighbors and Support Vector Machines.

Overfitting

  • Overfitting occurs when a statistical model or machine learning algorithm captures the noise of the data.
  • Intuitively, overfitting occurs when the model or the algorithm fits the data too well.
  • Specifically, overfitting occurs if the model or algorithm shows low bias but high variance.
  • Overfitting is often a result of an excessively complicated model,

Underfitting

  • Underfitting occurs when a statistical model or machine learning algorithm cannot capture the underlying trend of the data.
  •  underfitting occurs when the model or the algorithm does not fit the data well enough.
  • underfitting occurs if the model or algorithm shows low variance but high bias.
  • Underfitting is often a result of an excessively simple model.

Metrics used for Model Evaluation!

One of the most important things about any Machine learning or Deep Learning problem is the Evaluation of the model, and if you have just begun your career in these domains, there are a very good chance that you will find yourself confused mostly because of the terminology.

In this section I will try to summarize all the commonly used model evaluation metric.

Let us take a look at the below conversation and try to identify the possible outcomes from it, further exploring the type of errors that we come across:

“One fine morning, Jack got a phone call. It was a stranger on the line. Jack, still sipping his freshly brewed morning coffee, was barely in a position to understand what was coming for him. The stranger said, “Congratulations Jack! You have won a lottery of $10 Million! I just need you to provide me your bank account details, and the money will be deposited in your bank account right way…”

Here Null Hypothesis can be, that, the call was indeed a Hoax!
If the result of the Null Hypothesis test corresponds with reality, then it is said that a correct decision has been made.  However, if the result of the Null Hypothesis test does not correspond with reality, then two types of errors can be identified: type I error and type II error.

It is important to understand about these 2 errors before we move to Metric evaluations.

Type I & Type II Errors

A type I error occurs when the Null Hypothesis is true, but is rejected. It is also called the False Positive, this false positive error is basically a “false alarm” – a result that indicates a given condition has been fulfilled when it actually has not been fulfilled. Type I error here would mean that,  Jack gave the Bank Account Details and The call was actually a Hoax!

Type II error occurs when the null hypothesis is false, but erroneously fails to be rejected. It is also called False Negative, is where a test result indicates that a condition failed, while it actually was successful. A Type II error is committed when we fail to believe a true condition.

It’s hard to create a blanket statement that a type I error is worse than a type II error, or vice versa. The severity of the type I and type II errors can only be judged in context of the null hypothesis, which should be thoughtfully worded to ensure that we’re running the right test.

PRECISION & RECALL: A Standard Metric for Evaluation

Precision and Recall are considered as a very Standard metric for evaluation of Performance of all Classification models.
You can always come across people who are skeptic that precision and recall both are indicative of accuracy of the model. Though somewhat true, there is a definitive distinction between the two.

Precision accounts for the percentage of results that are relevant. Precision of a given class in classification, a.k.a. positive predicted value, is given as the ratio of true positive (TP) and the total number of predicted positives.
Recall on the other hand refers to the percentage of total relevant results correctly classified. Recall , a.k.a. true positive rate or sensitivity, of a given class in classification, is defined as the ratio of TP and total of ground truth positives.

Taking a deeper look at the Formulas of Precision and Recall, we can generalize that for a given classification model, there lies a trade-off between its precision and recall performance. If we are using a neural network, this trade-off can be adjusted by the model’s final layer softmax threshold.
To increase the Precision, the False Positive must be decreased and therefore a decrease in Recall can be seen, similarly, by decreasing our number of FN would increase our recall and decrease our precision. Very often for information retrieval and object detection cases, we would want our precision to be high.

F1 SCORE: A Simpler Metric of Evaluation

We can keep iterating and identifying a optimal trade off between Precision and Recall or use another more simpler Metric of Evaluation which uses both Precision and Recall to evaluate the model, called the F1 Score.

As it can be seen from the formula above, F1 score is the harmonic mean of Precision and Recall and its values range from 0(bad) to 1(good).
Our objective should be to simply maximize this value of F1 for a good model.

It is important to note that all the above mentioned metrics of Model Evaluation might be widely accepted for Classification problem models, they, however, fail to perform well when it comes to problems of Object Detection and Information Retrieval. To evaluate the models of object detection and information retrieval we generally use a metric called the mAP (Mean Average Precision).

Intersection over Union vs Mean Average Precision (IoU – mAP)

IoU measures the overlap between two boundaries, i.e the predicted boundary and the ground Truth. It is the ratio of area of intersection and area of Union between the two boundaries.
It is used to determine if a predicted bounding box (BB) is TP, FP or FN; you may be wondering about the True Negatives, well it is assumed that there exists an object in the image.

How It Works?? 

Assume you have an image with a Person annotated, this annotation serves as the ground truth of the object.
Now this image is passed through the object detector and you get a predicted bounding box for the person. Remember by default we assume our prediction to be True Positive if I0U > 0.5 ; now the following cases may arise :

  • True Positive,  I0U > 0.5 :
    This is a clear scenario where predicted bounding box and ground truth have a clear overlap and it is greater than our assumed threshold of 0.5.
  • False Positive, I0U < 0.5 :
    There are two scenarios where the predicted bounding box is considered as a FP,  i.e when I0U is less than 0.5, or when there is a duplicate bounding box which means 1 person is detected multiple times. 
  • False Negative :
    This happens when the predicted Bounding Box has a I0U > 0.5, but gives a wrong classification.

A Precision – Recall curve is then plotted. This precision-recall curve is a plot of the precision (y-axis) and the recall (x-axis) for different thresholds.The Average Precision is then calculated by taking the area under the PR curve.

Calculating mAP

The mAP for object detection is the average of the AP calculated for all the classes. It is also important to note that for some papers, they use AP and mAP interchangeably.

Exploring the YOLO evolution!!

YOLO (You Only Look Once) as its name suggest is an Algorithm that Takes complete Image as Input for Detection and Localisation as compared to other algorithms available which have different pipelines for Detection and Localisation.

As other algorithms treat object detection as a Classification problem, YOLO makes it a Regression problem that spatially separates bounding boxes and associated class probabilities.
Hence this network can be optimised directly on detection performance.

YOLO version 1

YOLO  architecture came with a bang! It had great advantages as compared to other competitors like R-CNN  and DPM (deformable parts model),

*  YOLO v1 could process frames in Real Time at 45 fps,
*  its smaller version Tiny YOLO v1 can do it at 155 fps.
*  YOLO  learns general features of objects better than other architectures, hence
*  YOLO architecture gives less False positive on background
the architecture however makes more localization errors as compared to its competitors

YOLO trains on full image and directly optimizes detection performance as it has 1 single pipeline for both detection and localization. It however has high detection accuracy but lower localization accuracy.

Unified Detection Algorithm of YOLO

  1. Input image is divided into an S × S grid. If the center of an object falls into a grid cell, that grid cell is responsible for detecting that object.
  2. Each grid cell predicts B bounding boxes and confidence scores for those boxes, i.e how confident model is that the box contains an object and also how accurate it thinks the box is that it predicts.
  3. confidence = Pr(Object) IOU ( if no object exists, confidence will be zero), it represents the IOU between predicted box & ground truth.
  4. Each bounding box contains 5 predictions x , y , w , h , confidence
  5. The above equation gives class-specific confidence for each box
  6. Evaluating YOLO on PASCAL VOC, we use S = 7, B = 2.
    PASCAL VOC has 20 labelled classes so C = 20. Final prediction is a 7 × 7 × 30 tensor.

Architecture

  • Inspired by GoogLe Net, YOLO v1 has 24 convolution layers + 2 Fully connected layer instead of ‘Inception modules’ used by GoogLeNet.
  • Input size of image is 448 x 448 x 3
  • The complete layer can be described below

  • A more descriptive architecture can be seen below
    yoloV1
  • A faster version of YOLO v1 ie Tiny YOLO v1 has 9 conv layer instead of 24
  • Adding both convolution and fully connected layer to pretrained networks can improve performance.
  • Initial convolution layers of N/W extract features from images while FC layers predict the output probabilities and coordinates
  • Activation function : ReLU function (all layers except final), Linear Func (final layer)
  • it use Sum-Squared Error because it is easy to optimize, it weights localization error equally with classification error which may not be ideal.
    Solution
    This architecture  increase the loss from bounding box coordinate predictions and decrease the loss from confidence predictions for boxes that have no objects.
  • YOLO v1 predicts multiple bounding box per grid cell.
  • the loss function only penalizes classification error if an object is present in that grid cell
  • to avoid overfitting we use Dropout Layer and extensive data augmentation.

Comparison to Other Detection System

  • YOLO has relatively low recall compared to region proposal-based methods like R-CNN

YOLO version 2

YOLO version_2 proposes a joint training algorithm  that allows us to train model on both detection and classification data. the major point of focus in this version is to improve Recall and Localization while maintaining classification accuracy.

Architecture

yolov2

  • YOLO v2 has 23 Conv layers instead of 24 in YOLO v1
  • Activation function : Leaky ReLU function (all layers except final), Linear Func (final layer)

Major changes to improve the above problems are mentioned below :

  1. Batch Normalization : By adding batch normalization on all of the convolutional layers in YOLO v1 , we get more than 2% improvement in mAP. It also helps regularize the model and we can also remove dropout from the model without overfitting. More info here
  2. High Resolution Classifier: YOLO v1 trained network on 224×224 images and increased the resolution to 448×448 for detection. This involves simultaneous switching and adjustment for new input resolutions.
    YOLO v2 however fine tunes classification network at full 448 x 448 input images for 10 epochs on ImageNe, it then fine tunes the resulting network on detection. This gives an increase of almost 4% mAP.
  3. Anchor Boxes: In YOLO v1 BBox were predicted using FC layer, in YOLO v2 this FC layer was removed and anchor boxes were used to predict BBox.
    And these anchor boxes for a given dataset is selected using k-means clustering
  4. Network was shrinked to operate at 416×416 input image instead of 448×448 to have a single grid right at center (since large object tend to occupy center).
    ie Image is down-sampled by a factor of 32 (13 x F) x (13 x F) = 416 | F;Factor = 32 using Anchor boxes brings a small decrease in accuracy.
    YOLO v1 (without Anchors)                            :                69.5 mAP  |  81% recall
    YOLO v2 (with 9 chosen Anchors)                 :                69.2 mAP  |  88% recall

    Problems with Anchor Boxes
    a) Box dimensions are hand picked
    b) Model Instability
  5. Dimension Clusters: solving the first issue of Anchor boxes
    Instead of choosing priors manually, a k-means clustering is run on training set BBox to automatically find good priors.
  6. Finer Features: This version of YOLO v2 predicts detection on a 13×13 feature map.
    Adding a passthrough layer brings features from earlier layer at 26×26 resolution. It concatenates high resolution features with low resolution features by stacking into different channels instead of spatial locations.
    This changes 26x26x512 feature map to 13x13x2048
  7. Multi-Scale Training:With this version of YOLO, instead of fixing I/P image size, the model changes the network every few iteration. At every 10th batch,  network randomly chooses new image dimensions.
    This makes sure that network can predict detentions at different resolutions.


YOLO version 3

YOLO version 3  has been the most recent update in the evolution of YOLO, it is an improvement on many fronts primarily on Accuracy and Speed.
This makes YOLO v3 a perfect choice for Real-Time detection systems. Here are the Highlights of this State-of-the-Art Model:

  • YOLOv3 is a 106 layer network, consisting of 75 convolutional layers.
  • To tackle the problems of Vanishing Gradient in such a dense network, Yolo_v3 uses Residual Layers at regular interval (total 23 Residual Layers)
  • Predictions at varied scales
  • Darknet-53 is used as Feature Extractor (part of YOLOv3 layers)

The Improvements made in this version are as follows :

  1. Bounding Box Prediction : YOLO_v3 predicts an objectness score for each bounding box using logistic regression.
    The width and height of the box are predicted as offsets from cluster centroids. We predict the center coordinates of the box relative to the location of filter application using a sigmoid function.
  2. Classifier : YOLO v3 uses a Logistic function Classifier for class prediction instead of a softmax function as used in YOLO v2. This helps in multi-label classification.
  3. Prediction Across Scales :  YOLO_v3 has the ability to predict at varied scales, as it uses Feature Pyramid Networks (FPN).
    As we know, an image can have objects of all sizes in it, and a good Detection algorithm must have the ability to detect all these objects present.
    It is also known that as we get deeper inside the Network, its feature map gets smaller & therefore the deeper we go, the harder it is to detect smaller objects.
    Therefore YOLOv3 uses FPNs to predict at different levels.Capture
    As shown above, there are 4 basic structure for multi-scale feature learning.

    (a) The most straightforward one. Construct an image pyramid and input each pyramid level to individual network specially designed for its scale. As a result, it is slow because each level needs its own network or process.

    (b) The prediction is done at the end of the feature map. This structure cannot handle multiple scales.

    (c) The prediction is done on feature maps at different depth. This is adopted by SSD. The prediction is done by using the features learned so far and further features at deeper layers cannot be utilized.

    (d) Similar to (c) but further features are utilized by upsampling the feature map and merged with current feature map. This is fascinating because it let current feature map to see its features in “future” layers and utilize both to do accurate prediction. With this technique, the network is more capable to capture the object’s information, both low-level and high-level.
    YOLO v3 uses (d) form with 3 different scales

The Mystery of Vanishing and Exploding gradients

Artificial Neural Networks as we know were invented in 1943 to mimic our biological Nervous system to help machines learn as humans do.
But it was not until 1975 that we were able to actually make machines learn and recognize patterns in a data, with the famous Back-Propagation Algorithm came a new hope of training of multi-layered networks.
It allowed researchers to train supervised deep artificial neural networks from scratch, although with a little success. The Problem for this low accuracy of training the ANN using Back Propagation was later identified by Sepp Hochreiter’s in 1991.

The Problem

  • The Vanishing Gradients
  • The Exploding Gradients

The Vanishing Gradient Problem

It is a common phenomena with gradient based Optimisation techniques and it affects not only the many-layered feed forward networks, but also recurrent networks.

In Deep Neural Networks adding more and more hidden layers makes our network to learn more Complex arbitrary functions and features and therefore have higher accuracy while predicting the outcomes or identifying a pattern/feature in a complex data such as Image and Speech.

But, adding a layer comes at a cost which we refer as the Vanishing Gradient.
The Error that is back propagated using the Back Propagation Algorithm might become so small by the time it reaches the input of the model that it may have very little effect. This phenomena is called the Vanishing Gradient Problem
This make it difficult to know which direction the parameters/weights should move to improve the cost function therefore causes premature conversion to a poor solution.

below is an example of how mathematically back propagation works for a 4 hidden layer network.

Some time it might so happen that ∂J/∂b1 becomes equal to zero, and hence may not contribute towards updation of weights, thus causing a premature end to the learning of the model.

The Exploding Gradients Problem

Let’s now talk about another scenario that is very common with Deep Neural Nets that leads to failure of model training.

Sometimes it might so happen that while updating the weights error gradients can accumulate and result in Large gradients, this is in turn result in large update of weights and therefore make a network unstable, worst case scenario being that the value of weights become NaN.


Solution to the Vanishing Gradient Problem

  1. The Simplest solution is to use a ReLU function  that doesn’t cause a small
  2. derivative or use a Residual Network as they provide residual connections straight to earlier layers.

the residual connection directly adds the value present at the beginning of the block, x, to the end of the block (F(x)+x) thus residual connection doesn’t have to go through the  activation functions that “squashes” the derivatives, resulting in a higher overall derivative of the block.

3. adding a Batch Normalization Layer also resolves the problem of Vanishing gradients as it normalizes the input .

Identifying the Exploding Gradient Problem

A few of the simple checks may help you identify if the training is undergoing the problem of Exploding gradient problem

1. The model is unable to get traction on your training data (e.g. poor loss).
2. The  model is unstable, i.e large changes in loss from update to update.
3. Model Loss and weights goes to NaN during training
4. The error gradient values are consistently above 1.0 for each node and layer during training.


Solving the Problem of Exploding Gradients

  1. When gradients explode, the gradients could become NaN because of the numerical overflow or we might see irregular oscillations in training cost when we plot the learning curve. A solution to fix this is to apply Gradient Clipping; which places a predefined threshold on the gradients to prevent it from getting too large, and by doing this it doesn’t change the direction of the gradients it only change its length.
  2. Network Re-designing
    Using a smaller Batch- Size while training might show some improvement in tackling the Exploding Gradients.
  3. LSTM Networks
    Using LSTMs and perhaps related gated-type neuron structures are the new best practices to avoid exploding gradients in networks.
  4. Weight Regularization
    if exploding gradients are still occurring, is to check the size of network weights and apply a penalty to the networks loss function for large weight values.


Batch Normalization

We all remember how working with Deep Neural Networks was a tiresome task a few years back, mostly because the Hardware available were not sufficient to crunch such huge amount of data.
But with the commercial availability of GPUs Training deep Neural Nets have become easier.
One of the complexity involved in Training any Network is its convergence.
We have many methods to achieve faster training and to solve any kind of trouble that arise when we want to train a Deep Learning model, one such method is BATCH NORMALISATION!!

The Problem!

Normalization of Data is usually done so that all our data resembles a normal distribution (i.e, zero mean and a unitary variance).
It preventing the early saturation of non-linear activation functions like the sigmoid function, hence making sure that all input data is in the same range of values, etc.

The PROBLEM however appears in the subsequent hidden layers because the distribution of the activation of nodes is constantly changing during training at each iteration. This slows down the training process as it is required that each layer must adapt themselves to a new distribution in every step… this is called INTERNAL CO-VARIANCE SHIFT.

The Solution!!

Hence we use Batch Normalisation to force the Inputs of each layer to have same distribution in every Training step.


Training YOLO v3 on custom Data set on Linux

YOLOs orignal concept is to be credited to Joseph Redmon, Ross Girshick, Santosh Divvala, Ali Farhadi.

Prerequisite:

1. Setup CUDA and cuDNN on your system, follow here (requires GPU, Ignore this step if you have a Only CPU machine)
2. Have all the libraries installed as per your knowledge, anything missing can be installed later.
NOTE : If you are using a Windows System to start using Darknet you must have a ‘GCC compiler’ and Linux like ‘make’ command.
Solution : Install Cygwin, and under DEVEL search, look for “gcc, make” and install

Download Darknet Code of YOLO from : https://github.com/pjreddie/darknet
Download YOLOv3 Weights file here: https://pjreddie.com/media/files/yolov3.weights
Download YOLOv2 weights file here: https://pjreddie.com/media/files/yolo.weights
Download darknet-53 weights file : https://pjreddie.com/media/files/darknet53.conv.74

  • we use these weight files for Transfer Learning, you can definitely train your model from scratch if you want, for that you may not require these weight files
  • place these weight files inside the “darknet-master” folder.

$ git clone https://github.com/pjreddie/darknet
$ cd darknet
If you wish to train the model for your own dataset using the GPU.
* open ‘Makefile’ and Change the GPU 0 to 1 and save it. If you installed openCV set OPENCV 0 to 1 otherwise not need.
$ make ( ‘make’ command compiles the darknet code)

How to make predictions on a Test Image using the pre-trained model of Darknet

To check you have got the darknet working , type : $ ./darknet
Expected Output >
usage: ./darknet <function>

Running darknet testing on a dog.jpg present data folder

Note: config file of Yolov3 is present in cfg folder; weight file is present in the root directory of ie the ‘darknetmaster‘ folder; test data is in data folder with name “dog.jpg”.

Just in case you guys get an error of “Aborted (Core Dump)” or “CUDA error : Out of Memory” like the one below, do the following :

Solution
1. open the cfg / yolov3.cfg
2. remove ‘#’ from Line 3 and Line 4 under ‘Testing” section

i.e #batch=1 ——————-> batch=1 and
#subdivisions=1 —————> subdivisions=1

Annotation & Data prepration

  1. Data Annotation : Create .txt-file for each .jpg-image-file – in the same directory and with the same name.
    Here is an example below for creating the txt file for each image.

Using LabelImg an Annotation tool , saves the annotation in YOLO format already, so you may get the txt in the above mentioned format.
LabelImg can be downloaded from here : https://github.com/tzutalin/labelImg.git

NOTE : To train with a YOLO configuration , you MUST have annotation in the above mentioned format.
Write a script if you have to, and get the txt in above format

2. Next step involves separating Training data & Testing data.
For this use the following code :
< please insert the path of dataset with annotation file in Line 5 >

import glob, os
# Current directory 
current_dir = os.path.dirname(os.path.abspath(__file__))
print(current_dir)
current_dir = '<Your Dataset Path>' 
# Percentage of images to be used for the test set 
percentage_test = 10;
# Create and/or truncate train.txt and test.txt 
file_train = open('train.txt', 'w') 
file_test = open('test.txt', 'w')
# Populate train.txt and test.txt
counter = 1 
index_test = round(100 / percentage_test)
for pathAndFilename in glob.iglob(os.path.join(current_dir, "*.jpg")):  
    title, ext = os.path.splitext(os.path.basename(pathAndFilename))
    if counter == index_test:
        counter = 1
        file_test.write(current_dir + "/" + title + '.jpg' + "\n")
    else:
        file_train.write(current_dir + "/" + title + '.jpg' + "\n")
        counter = counter + 1

Preparing the configuration file YOLOv3

Prerequisites :

  • Download a simple sample dataset with just 1 class from here

YOLO versions require 3 types of files to run training with them:

a) backup/customdata.names : this file contains the names of classes. Every new category should be on a new line, its line number should match the category number in the .txt label files we created earlier.
Since we have just 1 class

NFPA

b) backup/customdata.data : this file contains the following data:

  • no of classes we are training our data on
  • Training data list inside (train.txt), Testing data list inside (test.txt) ie path of jpg files that have been annotated
  • File that contains the names for the categories
  • Location where weight files must be saved
classes = 1
train = /home/ankit/Downloads/ImgLearning/darknet/backup/train.txt
valid = /home/ankit/Downloads/ImgLearning/darknet/backup/test.txt 
names = /home/ankit/Downloads/ImgLearning/darknet/backup/<coustomddata>.names
backup = /home/ankit/Downloads/ImgLearning/darknet/backup/

c) cfg/’customdata’.cfg

Following changes must be made inside the cfg file based on the 
number of classes you want to train your model on: (our case class=1)

Line 603 : set filters = (classes + 5)*3 in our case filters = 18
Line 610 : set classes = 1, i.e the number of category we want to detect
Line 689 : set filters = (classes + 5)*3 in our case filters = 18 Line 696 : set classes = 1, i.e the number of category we want to detect Line 776 : set filters = (classes + 5)*3 in our case filters = 18 Line 783 : set classes = 1, i.e the number of categories we want to detect

If you would have paid attention to the above line numbers of yolov3.cfg, you would observe that these changes are made to YOLO layers of the network and the layer just prior to it!

Now, Let the training begin!!

$ ./darknet detector train backup/nfpa.data cfg/yolov3.cfg weights/darknet53.conv.74


Nitty-Witty of YOLO v3

Modify code to save weight files regularly

Locate the file detector.c and change the line #135 (probably) from:

if(i%10000==0 || (i < 1000 && i%100 == 0)){ to
if(i%1000==0 || (i < 2000 && i%200 == 0)){

The original upper line saves the network weights after every 100 iterations till first 1000 and then saves only after every 10000 iterations. In the below case, we save after every 200 iterations till we reach 2000 and then we save after every 1000 iterations.
After the above changes are made, we need to recompile using the “make” command.

Hyperparameters

batch=64  ''' It is impractical to (and unnecessary) to use 
all images in the training set at once to update the weights.
So, a small subset of images is used in one iteration, and this 
subset is called the batch size.'''
subdivisions=16 ''' it refers to the fraction of batch size that
 will be processed on the GPU in one go
You can start the training with subdivisions=1,  
and if you get < out of memory> error, increase these subdivisions by multiple of 2 (eg 2,4,8,16) till the training proceeds successfully
The GPU processes batch/subdivisions number of images at any time, but full batch iteration completes only after all images are processed 

NOTE : During testing, both batch and subdivision are set to 1.
width=608    ''' it is the size to which original image will be resized 
height=608       before the training begins. ''' 
channels=3       Channel shows we will use RGB image
momentum=0.9   to penalise large weight changes between iterations
decay=0.0005   to penalise wights in case of Over-fitting
max_batches = 500200  No of Iterations training must run for

To save terminal logs and Plot Loss from it

The below command will save all the training logs visible on terminal into a <.log> file for future reference.

To save the Logs use below command
$ ./darknet detector train backup/nfpa.data cfg/yolov3.cfg weights/darknet53.conv.74 >> backup/<name>.log

To plot the loss from above saved log file
$ python3 plot_logfile_loss.py backup/<name>.log


Network Loading fails while Training using Pre-trained weights?

I have sometimes encountered the problem that my network wouldn’t load and ends with (ABORT) error if I use a pre-trained weights, but the training starts if the pre-trained weight is removed.
My best guess to this problem is the weight file is corrupted at some level hence change or download again the weight file.

Want to play with the layers of YOLO and modify its Architecture?

Good thing about Darknet Yolo is that its complete architecture is inside the “.cfg” file and therefore it is not required to mess around the the code to change its architecture.

Open the respective cfg file you are working on identify the layer you wish to modify and make the required modification, simply try by deleting the last layer, and see if the change is visible on your terminal when the network is being loaded.

Want to generate custom Anchor boxes for your data set ?

Use the python script “anchor_box_generator.py” from my Github repository available in the following link .

Table detection file